
How To Set Up A Minecraft Server in 2026 (Step-by-Step)
Want to create your own Minecraft server? This step-by-step guide covers hosting, Java, server software, RAM, configuration, plugins, port forwarding and launch preparation so you can build a stable server and start inviting players.
How to Set Up a Minecraft Server in 2026 (Step-by-Step)
You have an idea for a Minecraft server. Maybe it is a small survival world for friends, a public SMP, a competitive PvP network or something completely custom. The exciting part is imagining what players will do once they join. The less exciting part is figuring out how to actually get the server running.
Fortunately, creating a Minecraft server is much easier once you break the process into individual steps.
This Minecraft server setup guide walks you through everything from choosing where your server will run to installing server software, allocating RAM, configuring your world and making it accessible to other players.
We will focus primarily on Minecraft: Java Edition, as this is where software such as Paper, Spigot and Fabric is commonly used. Mojang provides its Java server software as a free download, while running a public server may also require firewall and router configuration if you are hosting it yourself.
By the end, you should have a working server that you can join, configure and begin developing into something other players actually want to play.
Step 1 — Decide What Type of Minecraft Server You Want
Before downloading anything, decide what you are actually building.
This decision affects almost everything that comes afterwards: your hosting requirements, server software, RAM, plugins and how much configuration will be required.
Start by answering a few basic questions:
How many players do you expect? A private server for five friends has very different requirements from a public server aiming for dozens of concurrent players.
What gamemode are you creating? Survival, Lifesteal, Skyblock, Prison, Gens and modded servers all require different setups.
Do you need plugins or mods? This determines whether you should use software such as Paper or Fabric.
Will the server be public or private? Public servers require extra consideration around security, moderation, backups and performance.
Will you host it yourself or rent hosting? Both approaches work, but they suit different users.
Self-hosting vs Minecraft server hosting
You can run Minecraft directly from your own computer, another PC in your house, a VPS or a dedicated Minecraft hosting provider.
Self-hosting gives you more control and can cost almost nothing if you already have the hardware. However, the computer normally needs to remain running whenever you want players to connect.
Minecraft hosting providers handle much of the infrastructure for you. You normally receive a control panel where you can install server software, upload plugins, manage files and restart the server.
For your first public server, managed hosting is often easier. If you enjoy Linux, networking and server administration, a VPS gives you considerably more control.
Tip: Do not pay for an enormous server before you have players. Start reasonably small and upgrade when your actual usage requires it.
Step 2 — Choose Your Minecraft Server Software
The next decision is your server software.
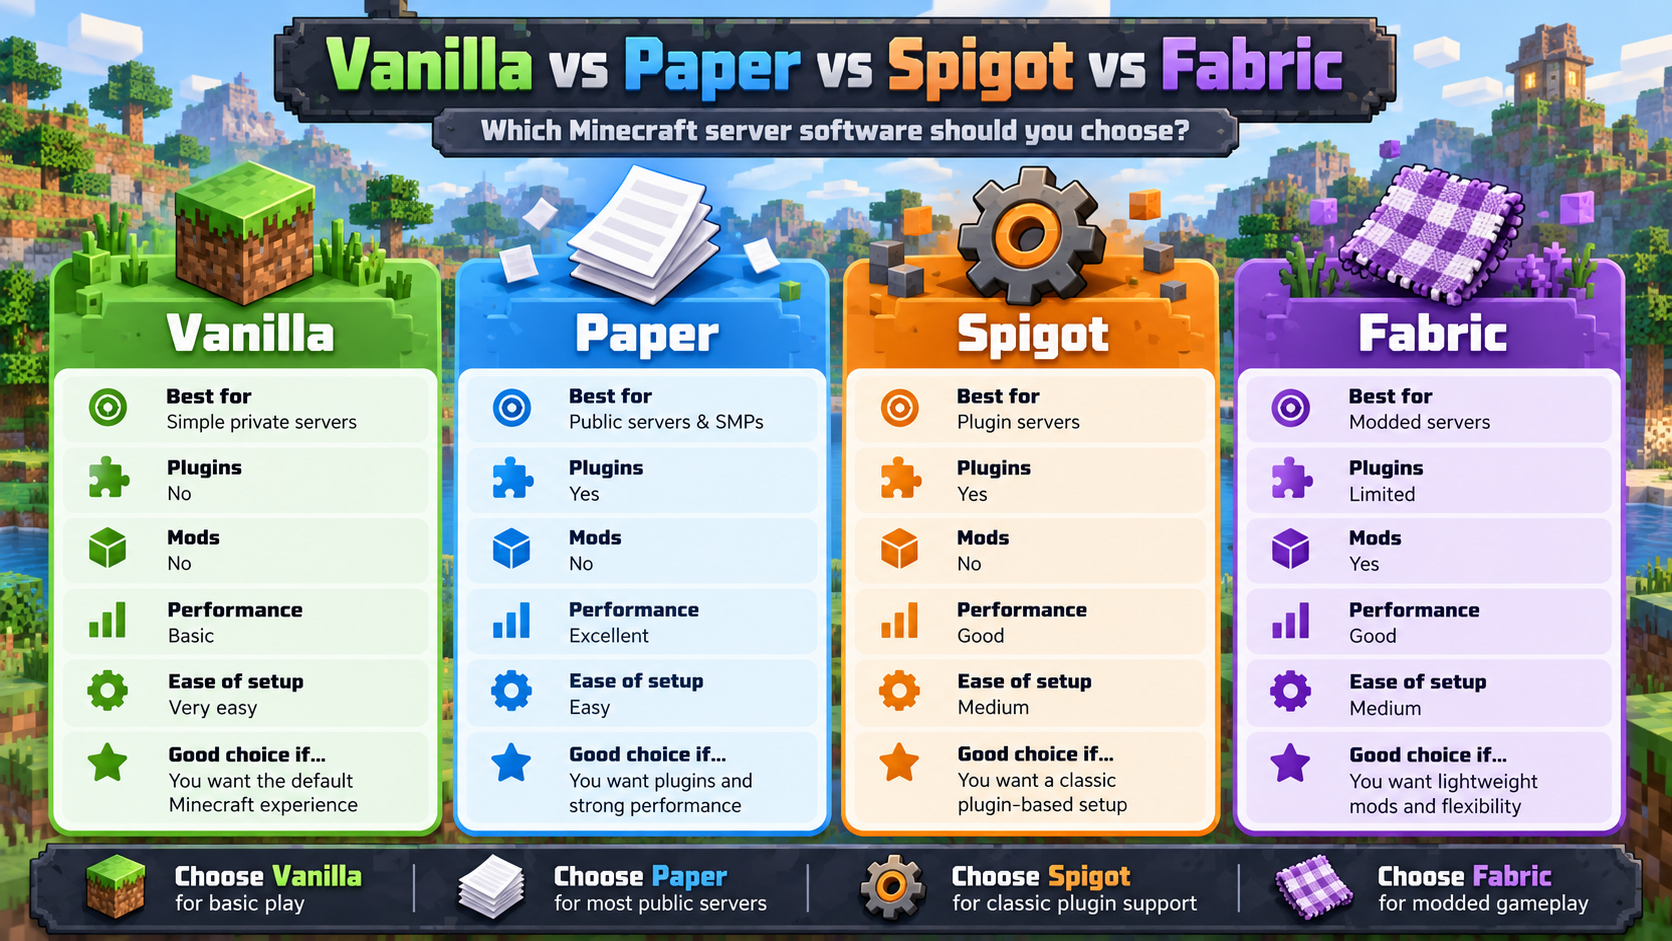
For Java Edition, the main options are Vanilla, Paper, Spigot and Fabric.
Vanilla
Vanilla is Mojang's official Minecraft server software.
Choose Vanilla when you want:
Normal Minecraft gameplay
Minimal configuration
No traditional server plugins
A simple private server
Mojang provides the Java Edition server software directly from Minecraft.net.
Paper
Paper is one of the most practical choices for public plugin-based Minecraft servers.
It builds on the Bukkit/Spigot ecosystem while adding extensive configuration and performance improvements.
Choose Paper if you want to create something like:
Survival SMP
Lifesteal
Gens
Prison
Skyblock
Economy server
Minigame server
Public community server
Paper provides downloadable server JAR files and currently requires Java 25 for Minecraft 26.1 and newer. Older Paper versions from Minecraft 1.20 through 1.21.11 use Java 21.
Spigot
Spigot remains an important part of the Minecraft plugin ecosystem and many plugins support its API.
For a new server, however, Paper will often be the more practical choice because it retains broad plugin compatibility while offering additional optimisation and configuration options.
Fabric
Choose Fabric for:
Modded survival
Performance mods
Custom modpacks
Servers where players install compatible client-side mods
Current Fabric documentation recommends Java 25 for Minecraft's newer 26.x releases, while Minecraft 1.20.5 and later releases before the 26.x transition used Java 21.
Which should you use?
For this tutorial, we will use Paper.
It gives new server owners a good combination of performance, configuration and plugin support without making the initial setup unnecessarily complicated.
Step 3 — Install the Correct Version of Java
A Minecraft Java server needs Java installed on the machine running it.
This is also one of the most common reasons a new server refuses to start.
For current Minecraft 26.x versions, you should expect to use Java 25. Minecraft 26.1 itself moved to Java 25, and Paper requires Java 25 for Paper 26.1 and newer.
If you are deliberately running an older server version, check its requirements instead of automatically installing the newest Java version.
A useful reference is:
Minecraft / Paper versionJava version1.17–1.19Java 171.20–1.21.11Java 2126.1+Java 25
Paper documents these requirements directly in its setup guide.
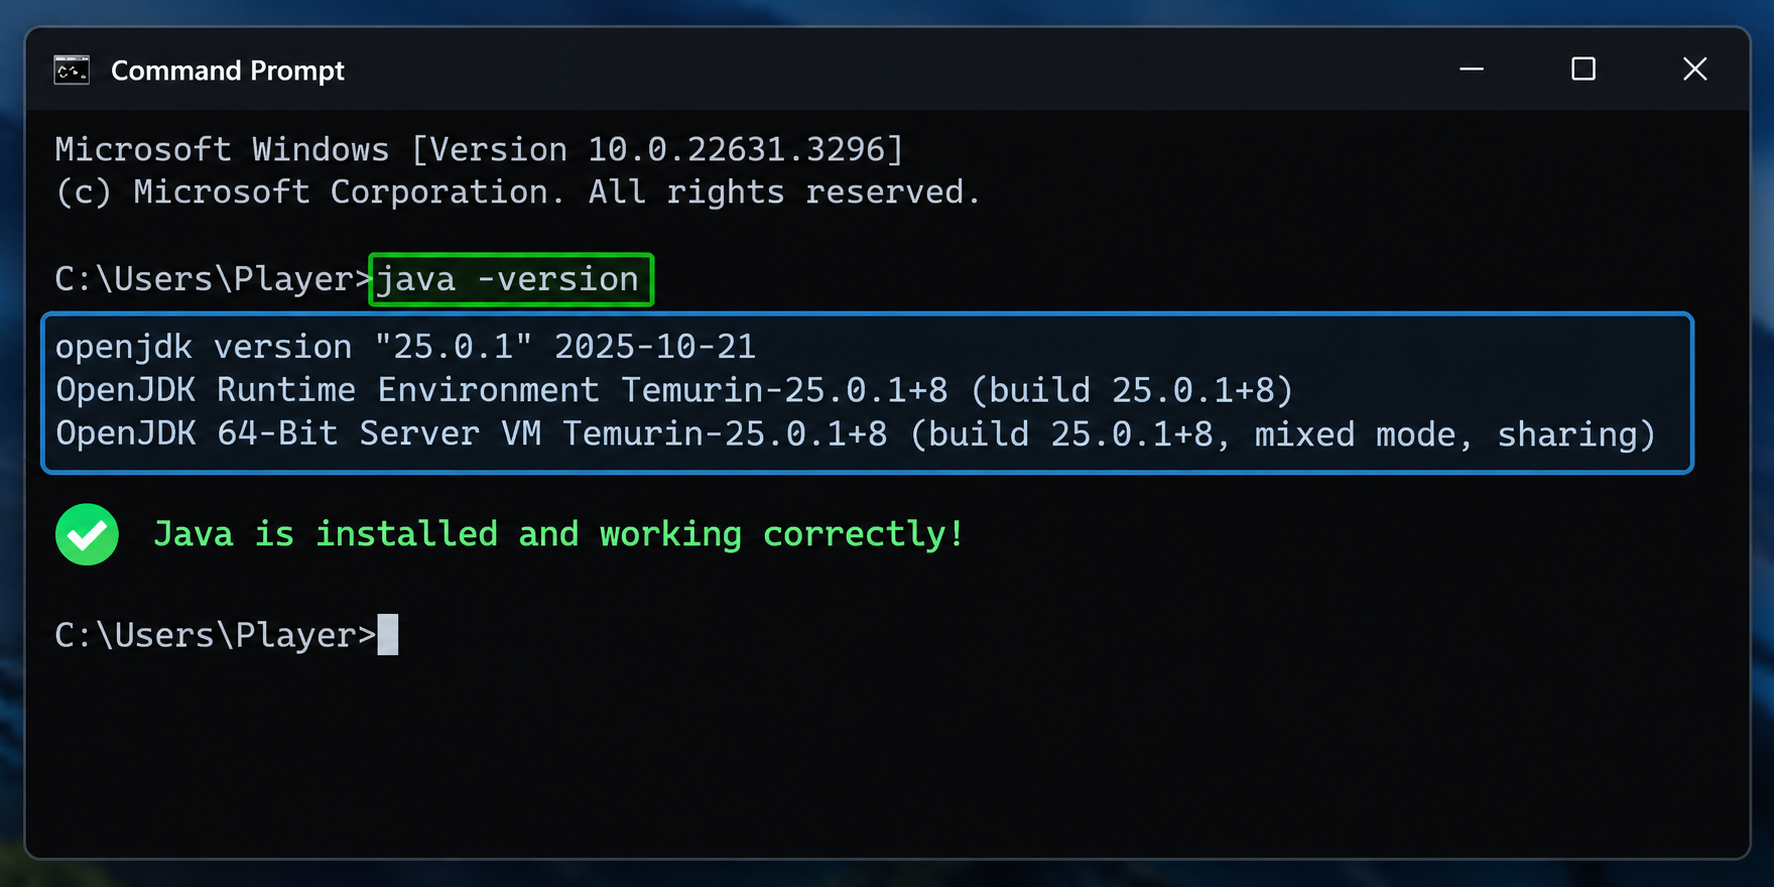
After installing Java, open Command Prompt, PowerShell or your terminal and run:
java -versionFor a current 26.x server, you should see Java 25 reported.
If your terminal says that java is not recognised or cannot be found, Java either has not been installed correctly or is not available in your system PATH.
Step 4 — Create Your Server Folder and Download Paper
Now create a dedicated folder for your Minecraft server.
For example:
MinecraftServer/Avoid placing random files in this folder. As your server grows, it will eventually contain your worlds, plugins, configuration files, logs and backups.
Next:
Download the appropriate Paper build for your Minecraft version.
Move the downloaded
.jarinto your server folder.Rename it to something simple such as
paper.jar.Create a startup script.
Run the server for the first time.
Paper recommends starting the server using a script or terminal command rather than simply double-clicking the JAR.
A basic startup command using 4 GB of RAM is:
java -Xms4G -Xmx4G -jar paper.jar --noguiPaper itself provides essentially this command in its getting-started documentation.
The two important memory values are:
-Xms4G
-Xmx4G
Xms controls the starting heap size and Xmx controls the maximum heap available to Java.
Paper notes that modern Java versions generally handle memory management well without requiring a huge collection of custom JVM flags, so you do not need to fill your startup script with optimisation flags you do not understand.
Step 5 — Accept the Minecraft EULA
The first time you start the server, it will generate several files and then stop.
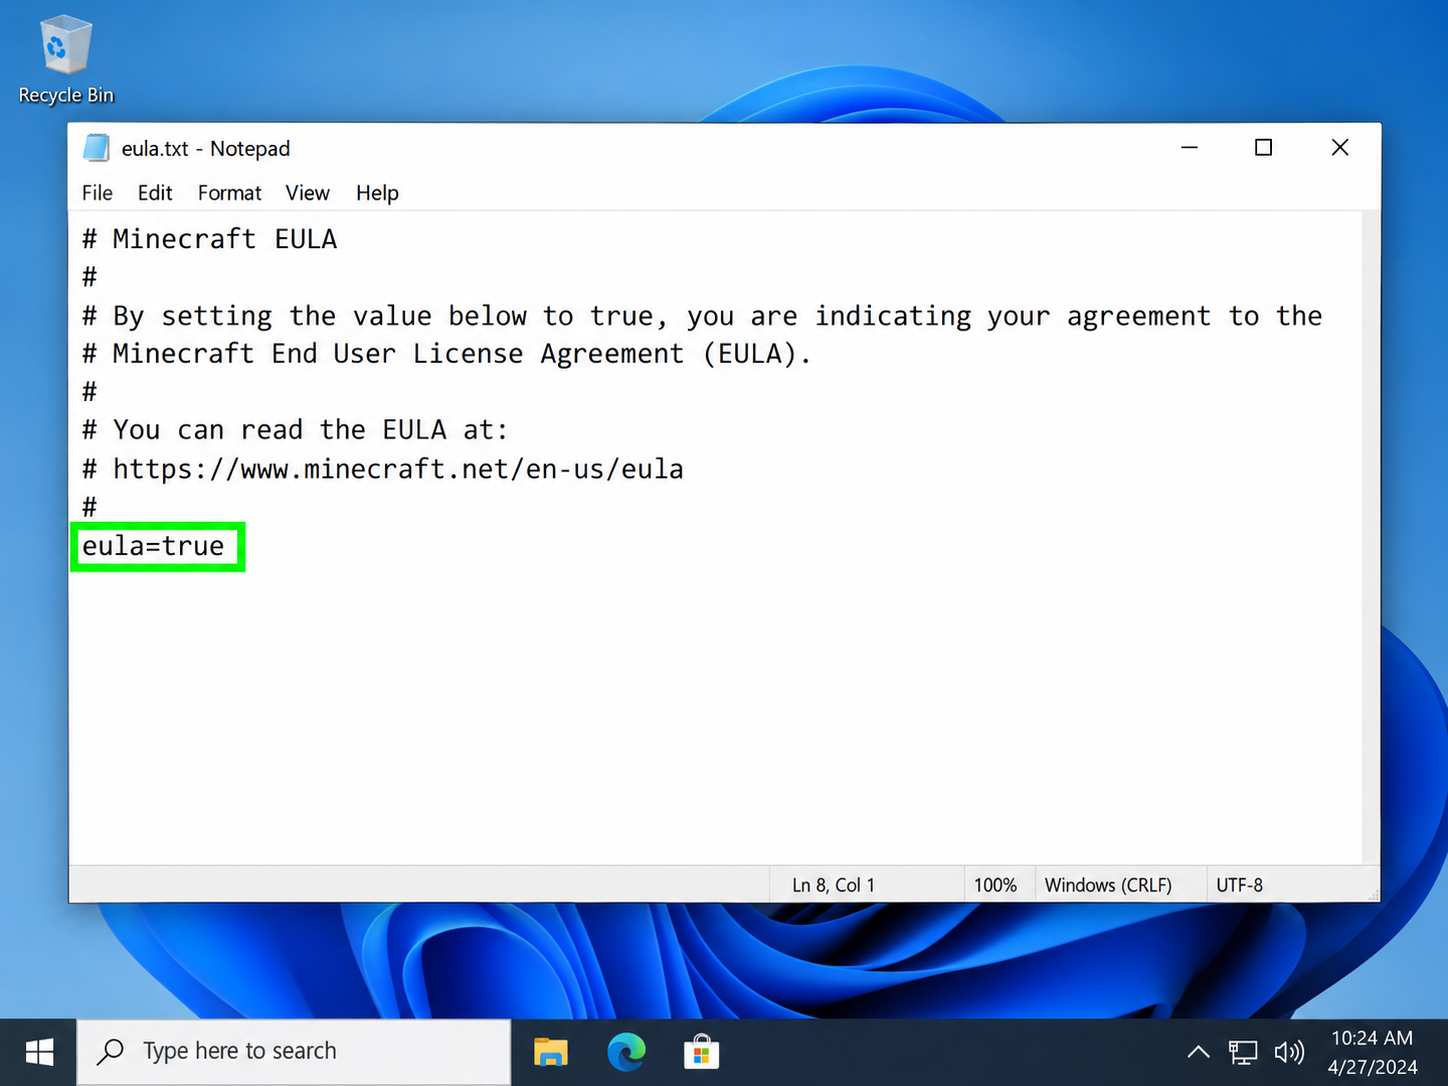
One of those files is:
eula.txtOpen it.
You will see:
eula=falseRead the Minecraft EULA and, if you agree to it, change the value to:
eula=trueSave the file and start the server again.
The server should now begin generating your Minecraft world.
Mojang states that downloading and running its server software is subject to the Minecraft End User License Agreement and Privacy Policy.
Step 6 — Give Your Server Enough RAM
One of the first questions new owners ask is how much RAM a Minecraft server needs.
There is no universal number.
RAM requirements depend on:
Concurrent players
Server software
Plugins or mods
World size
View distance
Simulation distance
Number of entities
Chunk generation
Custom gameplay systems
As a rough starting point:
Server typeStarting RAMSmall Vanilla server2–4 GBSmall Paper server4 GBGrowing plugin server4–8 GBHeavily customised server8 GB+Large modpackDepends heavily on the pack
These are starting points rather than guarantees.
A 4 GB server with good optimisation can outperform a badly configured 12 GB server.
Minecraft server performance is also heavily affected by CPU performance, particularly when processing demanding activity on the main server thread. Simply purchasing more RAM will not automatically fix every lag problem.
Start with realistic resources and watch how your server performs.
Step 7 — Configure server.properties
Once your server has successfully started, you can begin configuring it.
One of the main files is:
server.propertiesStop your server before changing important configuration files.
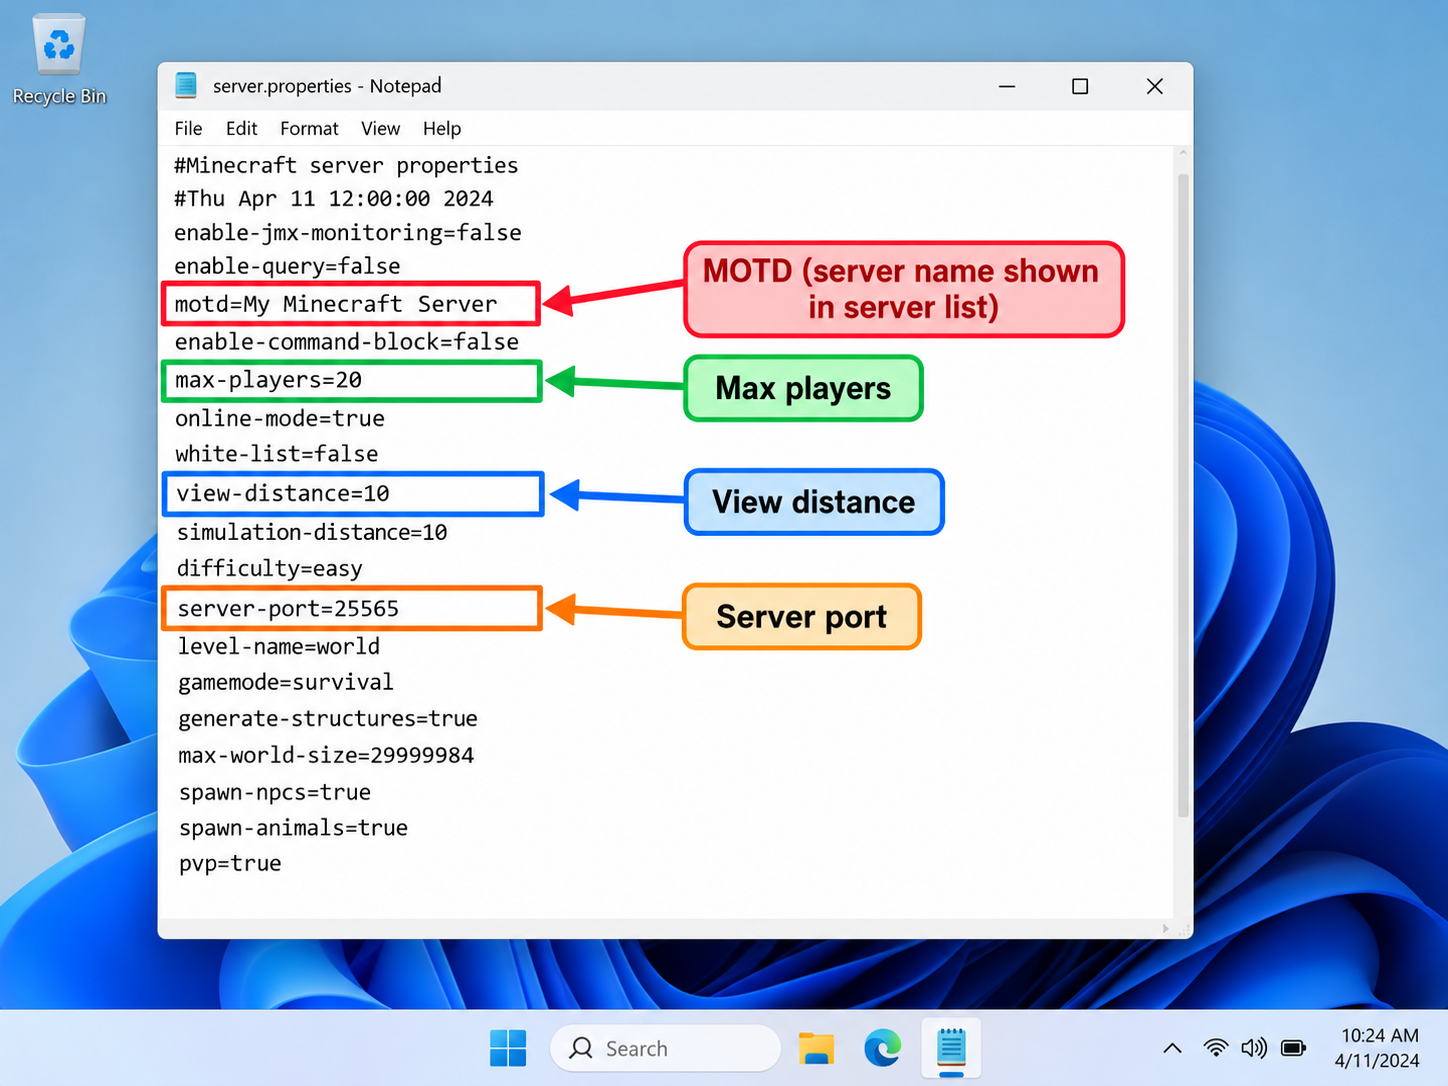
Common settings include:
motd=My Minecraft Server
gamemode=survival
difficulty=normal
max-players=20
pvp=true
online-mode=true
view-distance=10
simulation-distance=10
server-port=25565
Settings worth understanding
motd
The description players see when your server appears in their multiplayer list.
max-players
The maximum number of players that can connect simultaneously.
pvp
Controls whether players can damage each other.
online-mode
Controls Mojang account authentication. Public servers should normally leave this enabled.
view-distance
Controls how many chunks are sent to players.
simulation-distance
Controls how far around players the server actively processes game mechanics.
server-port
Java Edition commonly uses port 25565.
Do not randomly change every setting at once.
Make a few changes, restart your server and test them.
Step 8 — Install Plugins
This is where a basic server starts becoming your own server.
Paper servers can use plugins to add features that Minecraft does not provide by default.
Depending on what you are building, you might eventually add systems for:
Permissions
Economy
Homes and teleportation
Claims
Moderation
Anti-cheat
Scoreboards
NPCs
Crates
Custom items
Quests
Voting rewards
Server analytics
To install a plugin:
Stop the server.
Download the plugin from a reputable source.
Check that it supports your Minecraft and server software version.
Place the
.jarinside thepluginsfolder.Restart the server.
Check the console for errors.
Configure the files generated by the plugin.
Do not install 40 plugins before testing your server.
Add them gradually.
When something breaks, you will have a much easier time finding the cause if you know which plugin was added immediately before the problem appeared.
You should also keep a backup before performing major plugin updates.
Step 9 — Join and Test Your Minecraft Server
Before making your server public, test it locally.
If Minecraft is running on the same computer as your server, try connecting with:
localhostYou can also use:
127.0.0.1If the server is running on another machine in your home, connect using that device's local IP address.
Test basic functionality including:
Joining and leaving
World generation
Permissions
Commands
Plugins
Teleportation
Death and respawning
Inventories
PvP
Economy
Server restarts
Watch your console while testing.
Warnings and errors in the console can reveal problems that are not immediately obvious in-game.
Paper also recommends checking logs/latest.log when diagnosing startup or runtime problems.
Step 10 — Make Your Minecraft Server Public
If you use a Minecraft hosting provider, you will normally already have a public server IP or hostname.
If you are self-hosting from home, there are additional networking steps.
You will generally need to:
Give your server computer a stable local IP.
Allow Java or your Minecraft server through the firewall.
Log into your router.
Find the port-forwarding section.
Forward Minecraft's server port to your server computer.
Test the connection from outside your home network.
Java Edition commonly uses port:
25565Minecraft's official server guidance notes that network configuration such as port forwarding may be required for players connecting from outside your local network.
Do not share your home IP unnecessarily
If you plan to build a serious public server, consider using professional hosting, a VPS or suitable network protection rather than exposing your home connection directly.
A domain can also make your server easier to remember.
Instead of giving players something like:
203.0.113.10:25565you could eventually use:
play.essencemc.net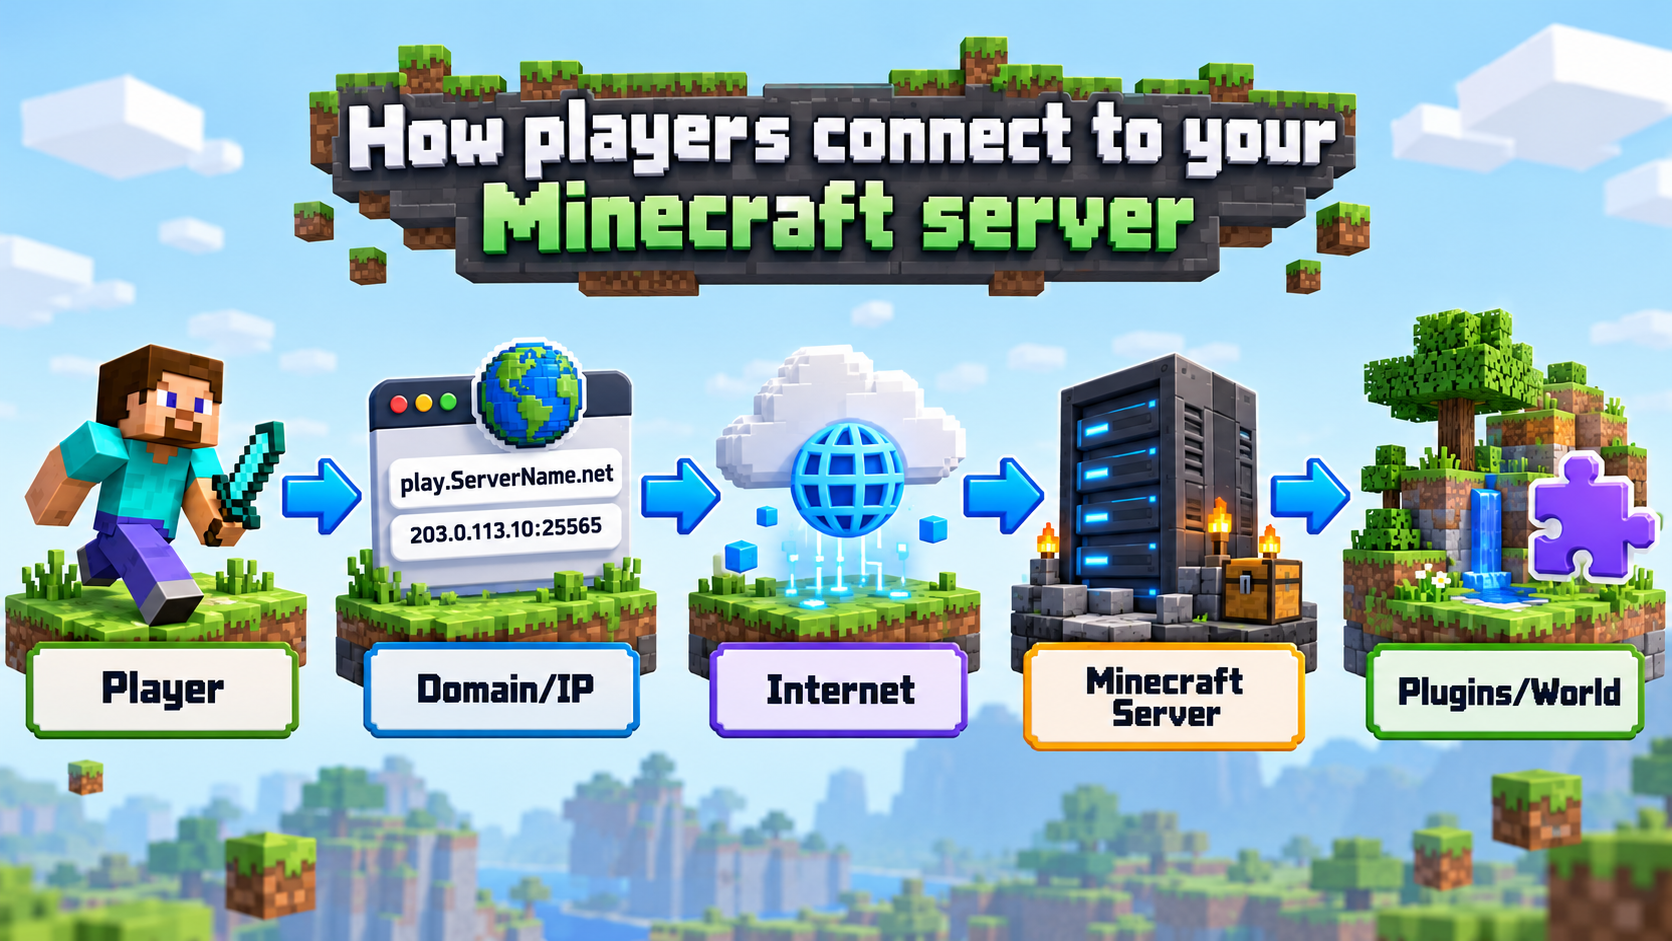
Step 11 — Secure and Back Up Your Server
A server is not finished just because players can connect.
Before inviting people, prepare for things going wrong.
Create automated backups
Back up:
World folders
Plugin data
Configuration files
Player data
Databases if applicable
Keep at least one backup somewhere other than the machine running the server.
If the server's drive fails, a backup stored on that same drive will not help you.
Control permissions
Do not give every staff member unrestricted operator access.
Use a permissions system and only provide the commands each role actually requires.
Keep software updated
Keep an eye on updates for:
Paper
Plugins
Mods
Java
Your operating system
Never blindly update a production server.
Back it up first and test major changes where possible.
Do not expose unnecessary services
Only open network ports you actually need.
If you run a VPS, use strong passwords or SSH keys and keep administrative services protected.
Step 12 — Prepare Your Server for Real Players
Technically, you could now publish your IP and start inviting people.
But first-time player experience matters.
Join your own server pretending you know absolutely nothing about it.
Ask yourself:
Is it obvious what I should do first?
Can I understand the gamemode?
Are important commands explained?
Is the spawn easy to navigate?
Do permissions work?
Are there unfinished areas?
Can players exploit anything?
Is there a reason to return tomorrow?
You should also test the server with several people simultaneously.
Your server may behave perfectly with one player but reveal issues when multiple players generate chunks, use commands and interact with plugins at the same time.
A technically working server is only the beginning.
The next challenge is turning it into a server people want to return to.
Step 13 — List Your Server and Start Growing
Once your server is public and stable, you need players to discover it.
That is where server directories and voting become useful.
You can list your Minecraft server on MCVoting and create a page where players can discover your server and vote for it.
Voting can also be connected to in-game rewards, giving existing players a reason to support your listing regularly.
When building your server listing, include:
A recognisable server name
Accurate server address
Clear description
Relevant gamemodes
High-quality server icon or images
Discord or community links
A clear explanation of what makes your server different
You can also browse all Minecraft servers to see how other communities present themselves.
If you are unfamiliar with server-list voting, read our guide on how to vote on Minecraft servers.
This is the stage where your mcs server minecraft project changes from something running on a computer into an actual public community.
Why Setting Up Your Server Properly Matters
It is tempting to rush through setup and immediately start advertising.
That usually creates more work later.
A proper setup gives you:
Better stability: fewer crashes and configuration problems.
Better performance: appropriate software and resource allocation reduce avoidable lag.
Easier expansion: organised files and plugins make future development simpler.
Better security: sensible permissions and networking reduce unnecessary risks.
Reliable backups: mistakes do not have to destroy months of progress.
Better first impressions: players are more likely to stay when the server actually works.
Your server does not need to be huge on day one.
A small, polished server is usually a better foundation than a massive unfinished one.
For anyone following an mcs server minecraft setup tutorial for the first time, the goal should be reliability first and complexity second.
Common Minecraft Server Problems and Troubleshooting
The server opens and immediately closes
Run the server through a terminal or startup script rather than double-clicking the JAR.
Look for the error message before the window closes.
Paper specifically recommends using a startup script and checking latest.log when diagnosing server startup failures.
Common causes include:
Wrong Java version
Incorrect JAR filename
Invalid startup command
Not accepting the EULA
Corrupted plugin
Port already in use
java is not recognised
Run:
java -versionIf Java cannot be found, reinstall the correct Java version and restart your terminal.
For Paper 26.1 and newer, you need Java 25.
I can join, but my friends cannot
If localhost works but players outside your network cannot connect, the problem is probably networking rather than Minecraft itself.
Check:
Firewall rules
Port forwarding
Correct local IP
Correct public IP
Whether your ISP restricts inbound connections
Whether the server is actually listening on the expected port
If you use a hosting provider, check its control panel and assigned server address instead.
My server is lagging
Do not immediately assume you need more RAM.
Check:
CPU usage
RAM usage
Plugin errors
Entity counts
View distance
Simulation distance
Chunk generation
Problematic farms
Plugin timings/profiling tools
Console warnings
Large amounts of new chunk generation can be particularly demanding.
If you expect players to explore extensively, pre-generating the world can reduce the amount of generation happening during normal gameplay.
FAQ
How much RAM do I need to run a Minecraft server?
For a small server, 2–4 GB can be enough to get started. A plugin-based Paper server may benefit from around 4 GB or more, while heavily customised or modded servers may require considerably more.
Player count, plugins, mods, world activity and CPU performance all affect the real requirement, so RAM alone should not be treated as a measure of server performance.
Is hosting a Minecraft server expensive?
It does not have to be.
You can self-host using hardware you already own, while rented Minecraft hosting can range from inexpensive entry-level plans to powerful dedicated machines.
The right option depends on your player count and technical requirements.
Start small and scale with your community instead of paying for resources you are not using.
Can I run a Minecraft server for free?
Yes.
Mojang provides the official Minecraft Java and Bedrock server software for free.
You can therefore run a server on your own computer without paying for Minecraft hosting, although you still need suitable hardware, electricity and an internet connection.
For a public community, paid hosting can become worthwhile because the server can remain online independently of your own computer.
What is the best server software: Paper, Spigot or Fabric?
It depends on what you are building.
Paper is an excellent option for most plugin-based public servers.
Spigot provides the established Bukkit/Spigot plugin ecosystem, although many owners choose Paper because it adds further configuration and optimisation while maintaining broad compatibility.
Fabric is better suited to servers built around mods.
If you want a traditional SMP, Lifesteal, Gens, Prison or similar public server with plugins, Paper is usually a sensible place to start.
How do I make my Minecraft server public?
If you use a Minecraft hosting provider, connect using the IP or hostname they provide.
If you host from home, you will normally need to configure your firewall and forward the Minecraft server port through your router to the computer hosting the server. Minecraft's official documentation notes that this network configuration may be necessary for external connections.
You can then share the server address with players or connect a domain such as:
play.essencemc.netOnce your server is ready for the public, you can also list it on MCVoting so players can discover and vote for it.
Conclusion
Creating your own Minecraft server can look complicated from the outside, but the process becomes straightforward when you tackle it one stage at a time.
Choose the right hosting environment, install the correct version of Java, select suitable server software, configure your world, test your plugins, secure your server and make regular backups before opening the doors to players.
Once the technical setup is finished, the real work begins: creating a server that gives players a reason to join and an even better reason to return.
Explore hundreds of Minecraft servers, read real player reviews, and cast your vote at MCVoting.com — the community-powered Minecraft server directory.
Ready to grow your server? List your Minecraft server on MCVoting for free and start receiving votes today.